
To get you started with the software we'll be posting the quickstart guide here. Today we'll start with some of the basics.
There's a few extra information / resource sharing spots that may get you started (I'll list some more stuff later).
* Official - feature list
Community:
* Rpgmakervxace.net
* Rpgmakervx.net
* Rpgmaker.net
* SteamCommunity.com
* Steam DLC Guide
Resources:
* Resources on Deviant Art
* Rpg-maker-artists.deviantart.com
* VxResource.wordpress.com
* Rpgmaker.net/resources
* Rpgmakervxace.net
* Rpgmakervx.net
* DivisionHeaven
* VictorScripts
Tutorials:
* Rpgmakerweb
1. Getting started
Upon first launching the software you'll be facing an ocean with a character in it.If not, no worries - the first step to take is to click: "File -> New Project".
Select a good spot to save your first game or "RRVS_TestProject", and hit ok.
Now, if you weren't facing a small lake before, you should be seeing it now. You'll probably have the urge to press some button or jump into drawing right away - resist that for now.
 In the bottom-left there should be a panel with your "test project" name, and "MAP001" under it.
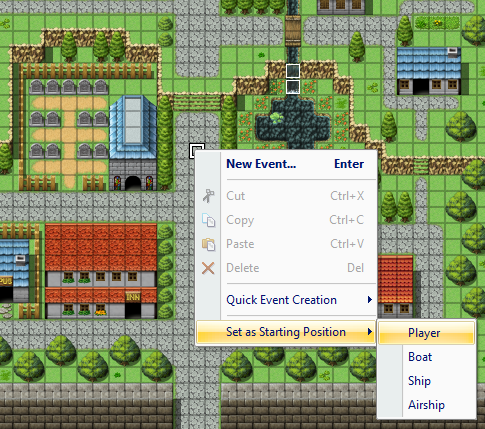 Right click here, and select "load sample map". This folder should
provide you with a ton of inspiration and play-things with which to
learn the initial basics. For now I'd recommend just picking "Regular
Town" and setting the zoom factor to 1/2.
Right click here, and select "load sample map". This folder should
provide you with a ton of inspiration and play-things with which to
learn the initial basics. For now I'd recommend just picking "Regular
Town" and setting the zoom factor to 1/2.Press F6 to enter event mode and right click the middle of the map. Select "set as starting position -> player".
Next, delete "MAP001" and hit the green arrow (F12) in the top-right of your screen.
Note: Across all your maps, you can only always have "one" player starting position. This will be useful for testing your maps.
At this point you'll launch the game, and get control over the character.
If you used the small town as sample map, you'll quickly notice you won't be able to enter any buildings. We'll get right into that.
2. Transfer and Door Events
If you're an avid RPG player, you'll know there's multiple areas, towns, overworld, dungeons etc which make up an RPG. To switch between these different maps, we need to create "Transfer Events" or doors in the places where you wish to allow the player to do this.First, we add another map (easiest for now) just right-click the bottom-left field again and add a sample field. A good choice would be "InnF1F". Your sample project will now have 2 maps. Feel free to select it and see how it looks.
 Next, we create the actual transfer event.
Go to your main map and ensure you're in event editing mode (F6).
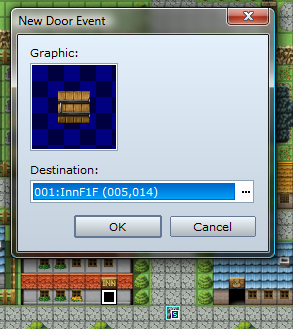
Right click a doorway and select "Quick event generation -> Door". Click the "..." icon next to the destination, and sele
ct the other map (InnF1F if you followed the above steps), then select the starting position on that map and press OK.
Note: Doors work exactly the same (meaning you just walk into it), except they show a "door" in the place where the transfer event is initiated from.
Press OK again to close the dialog and finalize the event.
Let's play test the new event and see if it works! (F12)
If you now walk into the doorway, you'll be transferred to the new map, but,. no way back yet.
See if you can create it before continuing to the next chapter.
Usage tips
* To allow your character to transfer between the large map and town, it's advised to use transfer events.
* To transfer from town to interior or between interiors and dungeons, it's recommended to use a door event.
That's not set in stone obviously, as you can have houses with open doors use transfer events - be creative, use what you think looks good.
3. Innkeepers and Chests
 Since you've used a "quick event" just now, I'm sure you'll have noticed
the other two choices there, so let's handle those as well.
Since you've used a "quick event" just now, I'm sure you'll have noticed
the other two choices there, so let's handle those as well.Go to the "InnF1F" map that you've got in the map list, and once again ensure "event editing mode" is active. Find a good spot for your innkeeper (even through a single wall will work, so you can put the innkeeper behind a counter) and right click to place him. Yo
That's it! Creating an inn has never been easier.
Obviously while testing your character will not have any gold, so for the time being it's a good idea to put up a treasure chest.
There's a quick event for this as well as you've no doubt noticed. Right click near the innkeeper and select "Treasure Chest". Set the content to be 10 gold or so.
If you want, you can select items, weapons or armor in the same manner.
You can obviously create and review items as well - just press F9 to open the game database.
To be continued.
0 comments:
Post a Comment